Author: Admin
Categories
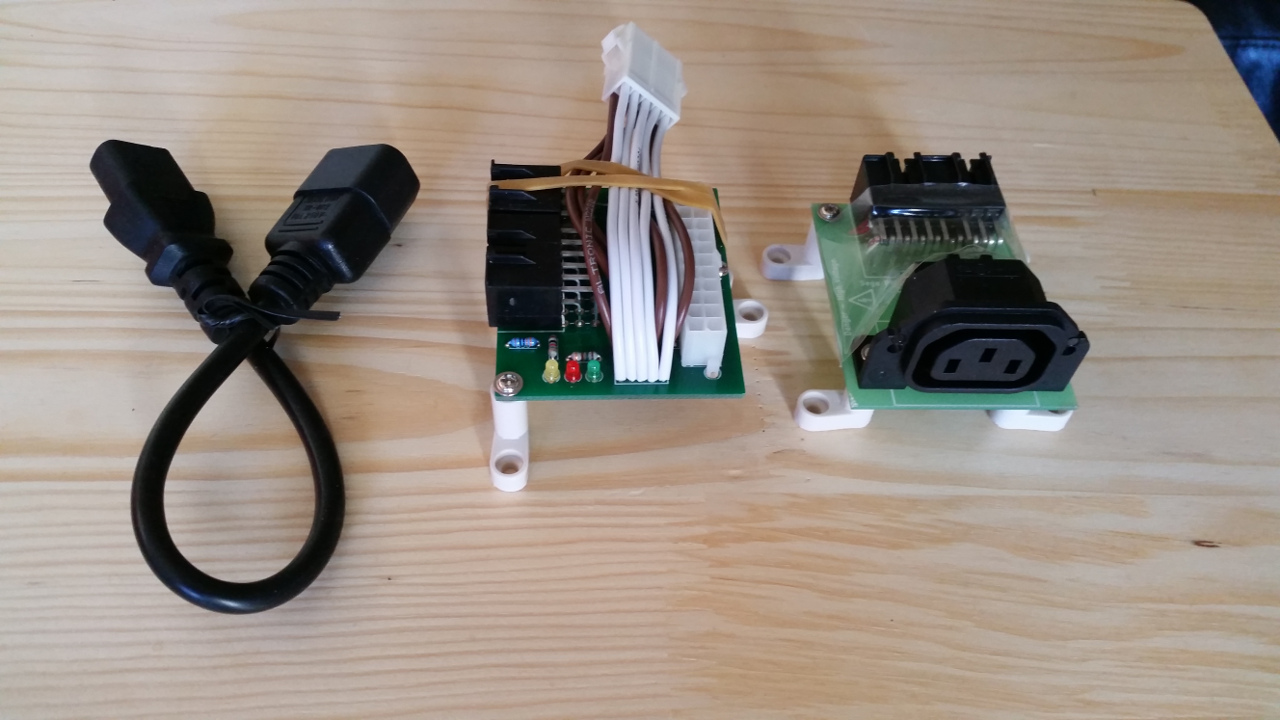
Sega PSU to ATX PSU Adapter
14-Oct-2022: A new version of the adaptor is available through Highway Entertainment
Below are some images of the new version of the Sega to ATX psu adapter.
We are pleased to announce the distributor for these is Highway Entertainment. http://www.highway.net.au/news/introducing-the-sega-to-atx-power-supply-adapter-kit/450.html
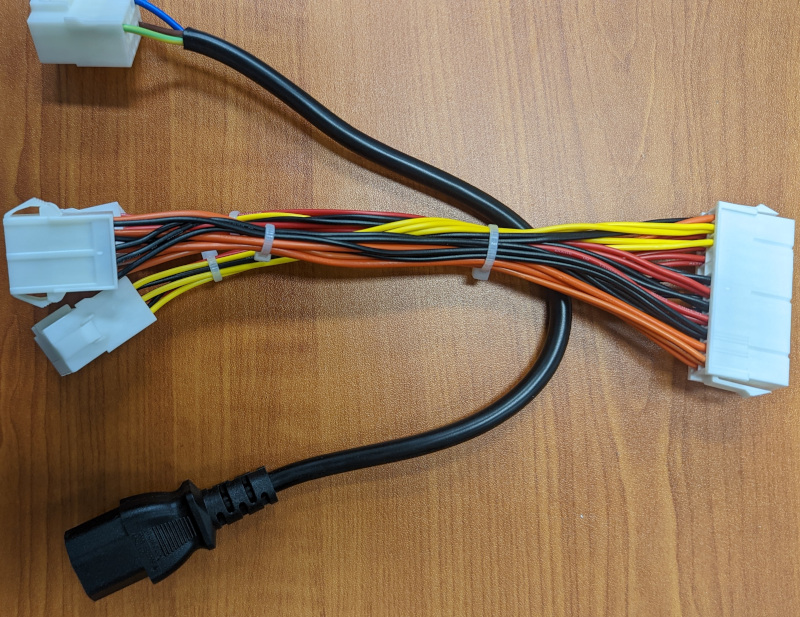
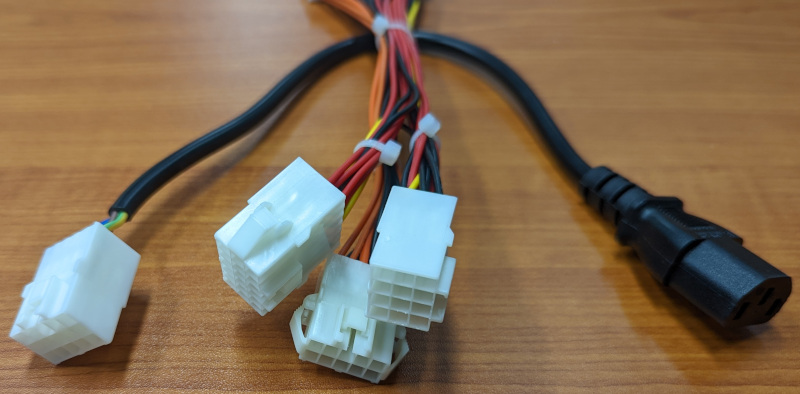
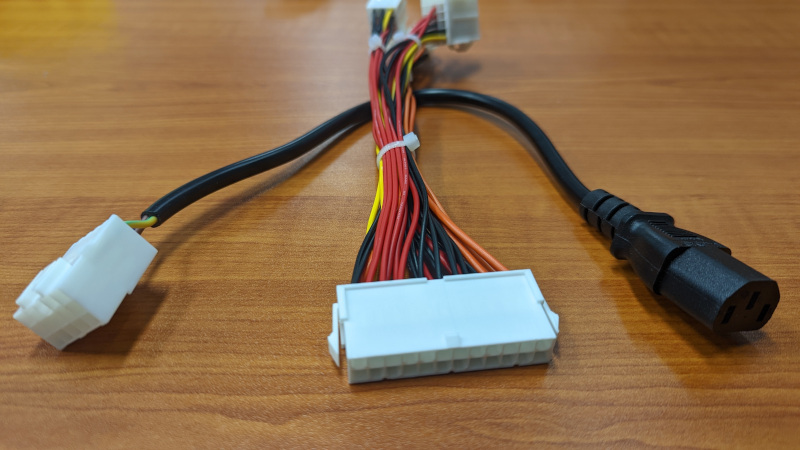
Over the last few months I have been working on a adapter board to allow Sega power supplies such as the Model 1 and Model 3 PSU, be replaced with a generic ATX power supply without needing to modify the wiring loom. These power supplies, which are no longer available, used to cost over $400 USD from Sega.
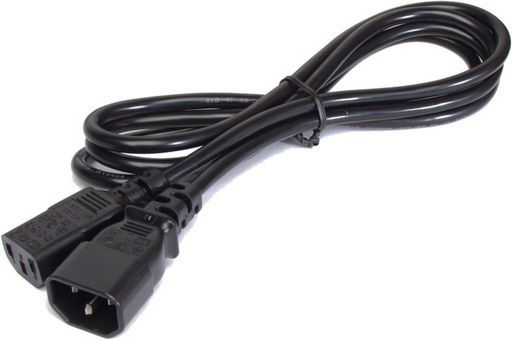
This kit will include these two boards and a 30cm IEC C13 to C14 cable. It is expected that these will be available for sale around the beginning of August 2015.
These power supplies were used in games such as Virtua Racing, Star Wars Arcade, Virtua Fighter, Wing War, Sega VR-1, Dennoo Senki Net Merc, Virtua Fighter 2, Manx TT Superbikes, Sega Rally Championship, Sega Rally Pro Drivin', Sky Target, Virtua Cop 2, Dead or Alive, Dynamite Baseball, Dynamite Cop, Pilot Kids, Virtua Fighter 2.1, Motor Raid, Zero Gunner, Boat Race GP, Virtua Fighter 3, Virtua Fighter 3tb, Sega Bass Fishing/Get Bass, Scud Race, Le Mans 24, Scud Race Plus, Harley Davidson & L.A. Riders, Fighting Vipers 2, Sega Rally 2, Ski Champ, Daytona USA 2, Daytona USA 2: Power Edition, Dirt Devils, L.A. Machineguns, Spike Out, The Lost World: Jurassic Park, The Lost World: Jurassic Park Special, Virtua Striker 2, Virtua Striker 2 Version '98, Virtual-On Oratorio Tangram, Star Wars Trilogy Arcade, The Ocean Hunter, Emergency Call Ambulance, Magical Truck Adventure, Spikeout Final Edition etc etc...
After lots of effort things are finally coming together and the boards should be available sometime in the next couple of months.
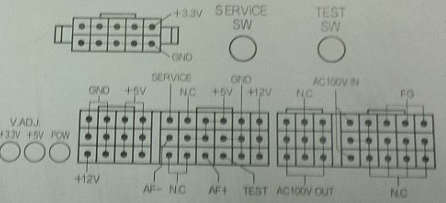
Power supplies with a pin out like that in the below images can be replaced with an ATX power supply with this kit.
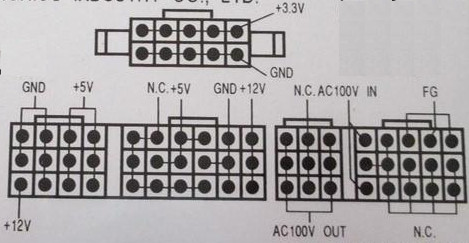
This version (below) has a -5v on CN2, but it is not connected on the wiring harness in the Sega machines.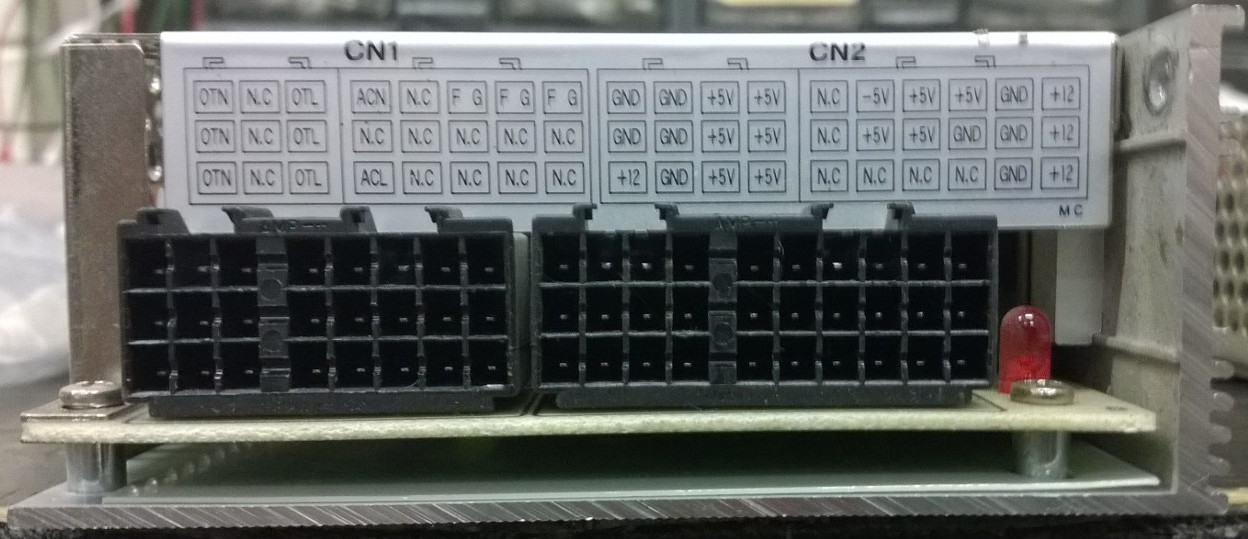
Further down this page you will find pictures of power supplies that are able to be replaced with this adapter kit.
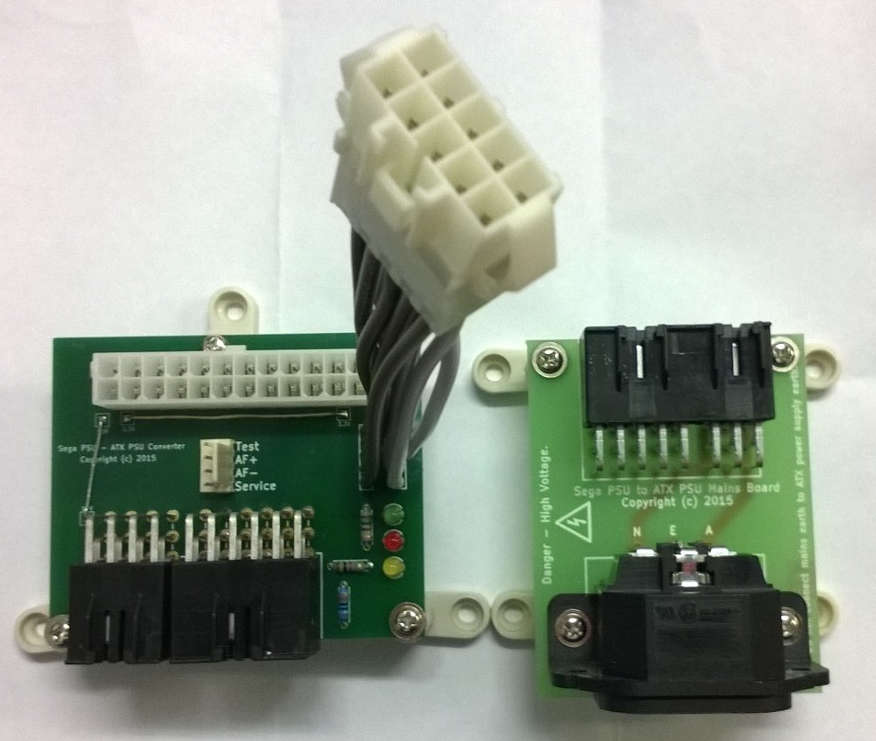
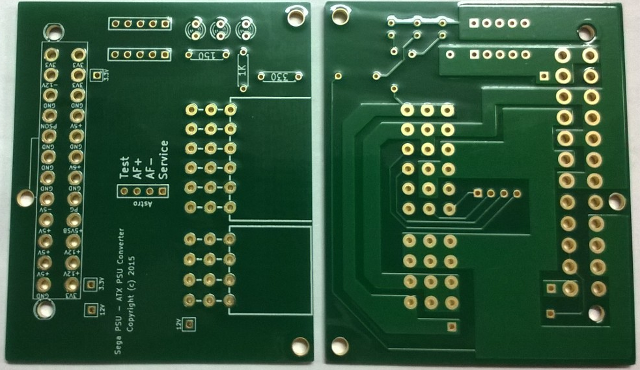
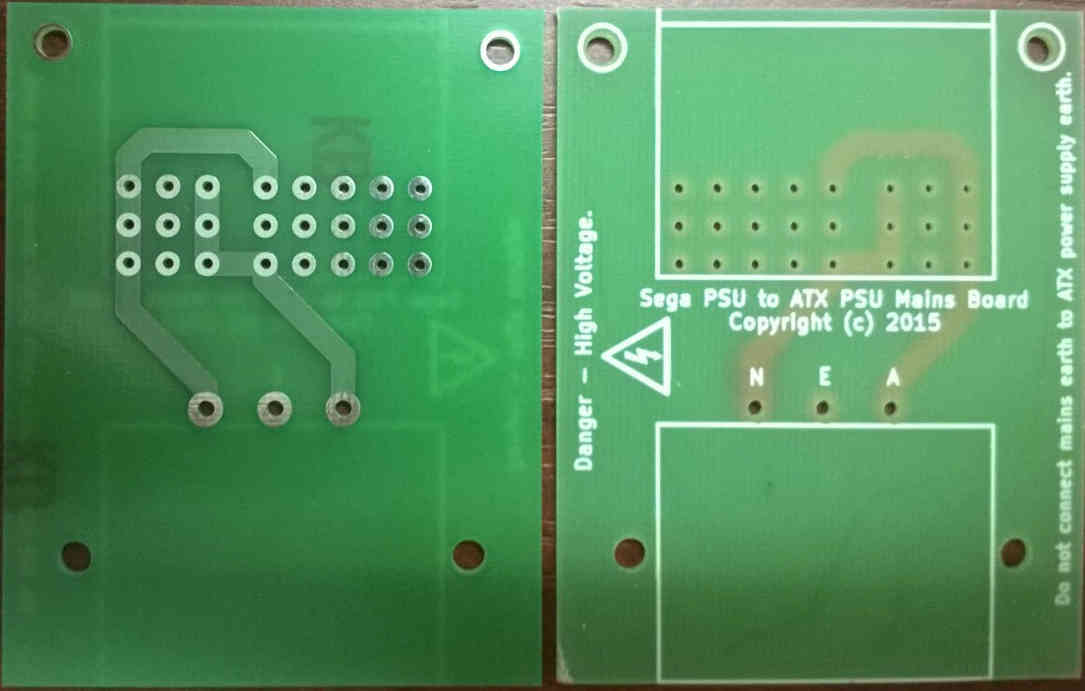
DC Board
The DC Board has indicator led's for the presence of 3.3v, 5v and 12v.
I have added a connector labelled Astro to the board for the Service, Test, AF+ and AF- for Astro City.
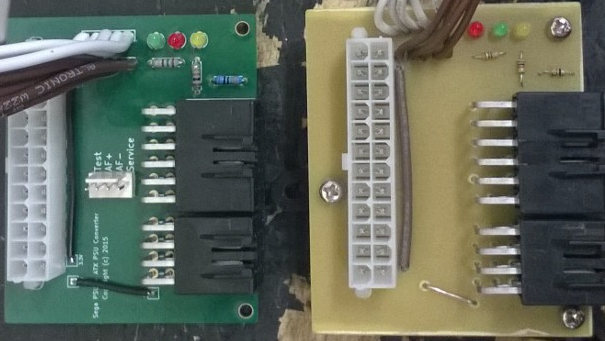
Below is a picture of an early prototype on the right and the final finished board on the left.
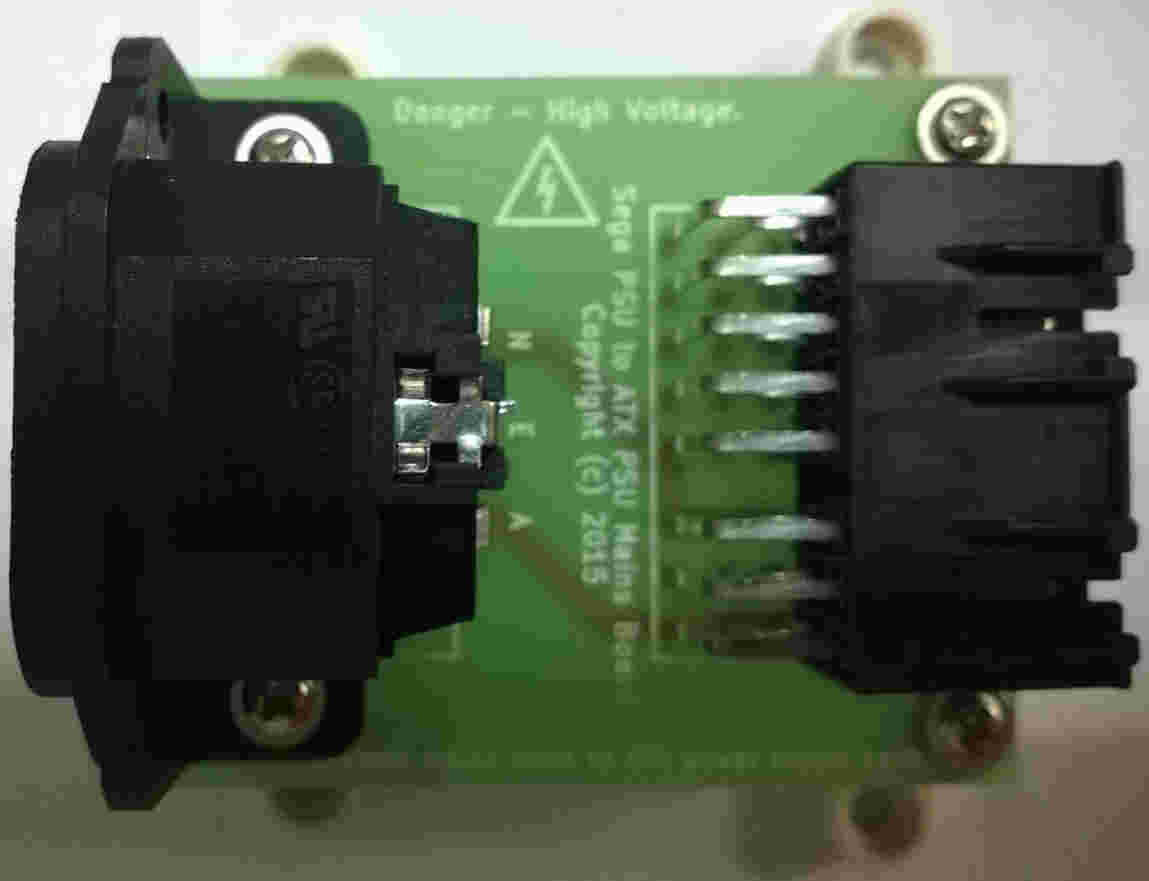
The kit will include 2 boards. One board will accept the existing 110V plug in, and will have an IEC female output to go to the ATX PSU. The second board will take the 20 or 24 pin ATX plug and present the same connectors as you get on the original power supply. There are quite a few power supplies that can be replaced with this kit.
Power supplies like those pictured below can be replaced.
Note: Some power supplies do not have a 3.3v connector. If that is the case then the connector is simply not used.
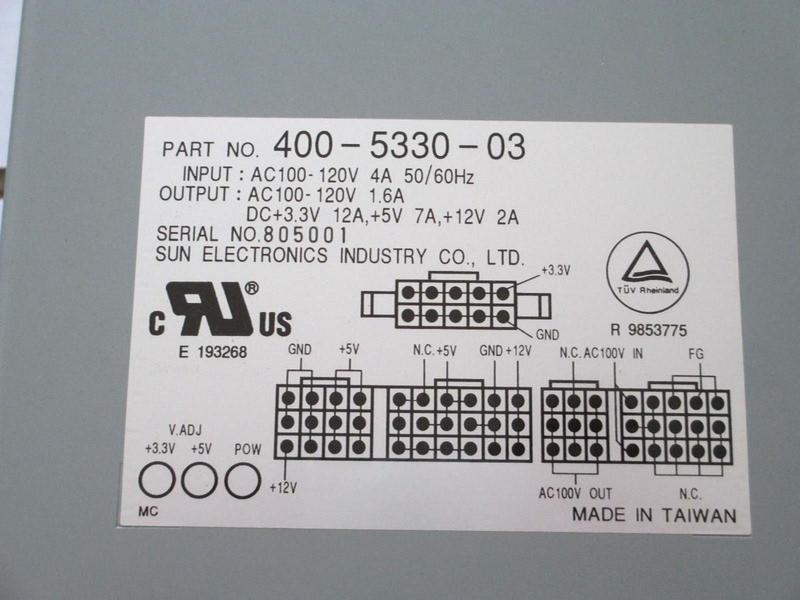
400-5330-03 PSU
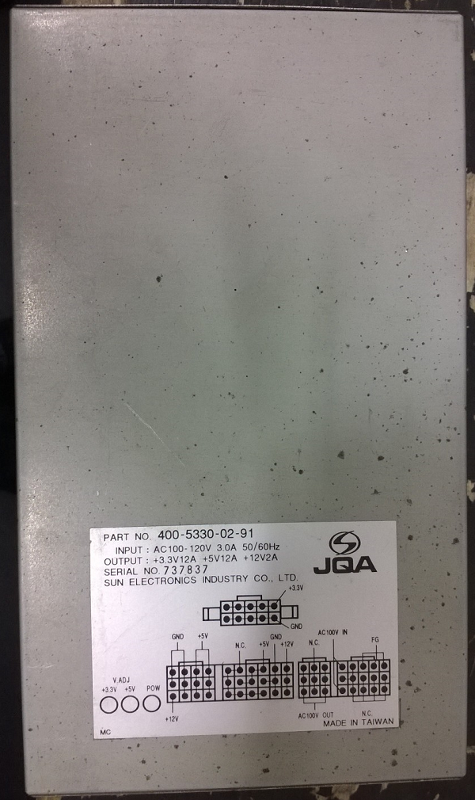
JQA Power Supply / 400-5330-02-91
Top View
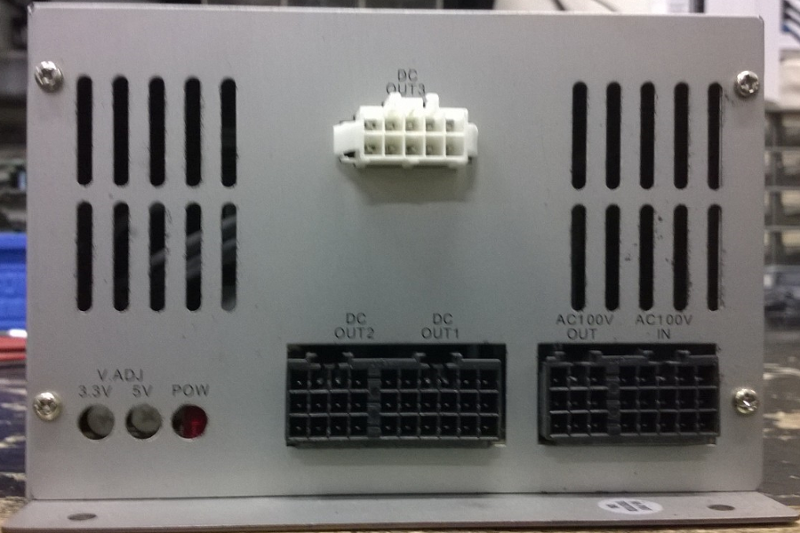
Front View
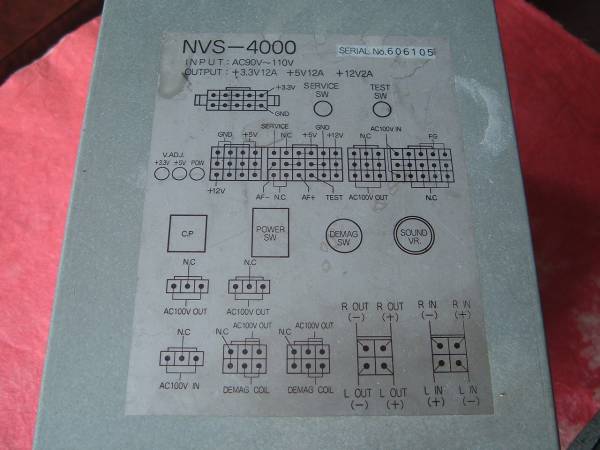
NVS-4000 PSU
This unit is common in Astro cabinets and has a couple of extra wires which we have also included on the replacement board.
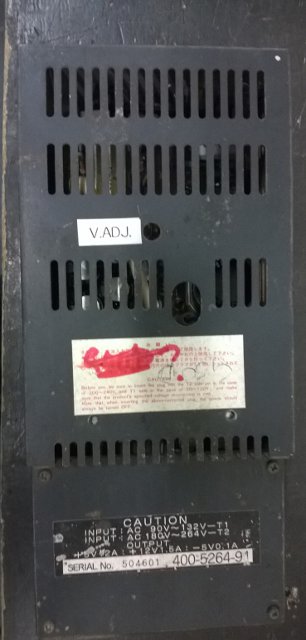
400-5264-91 PSU

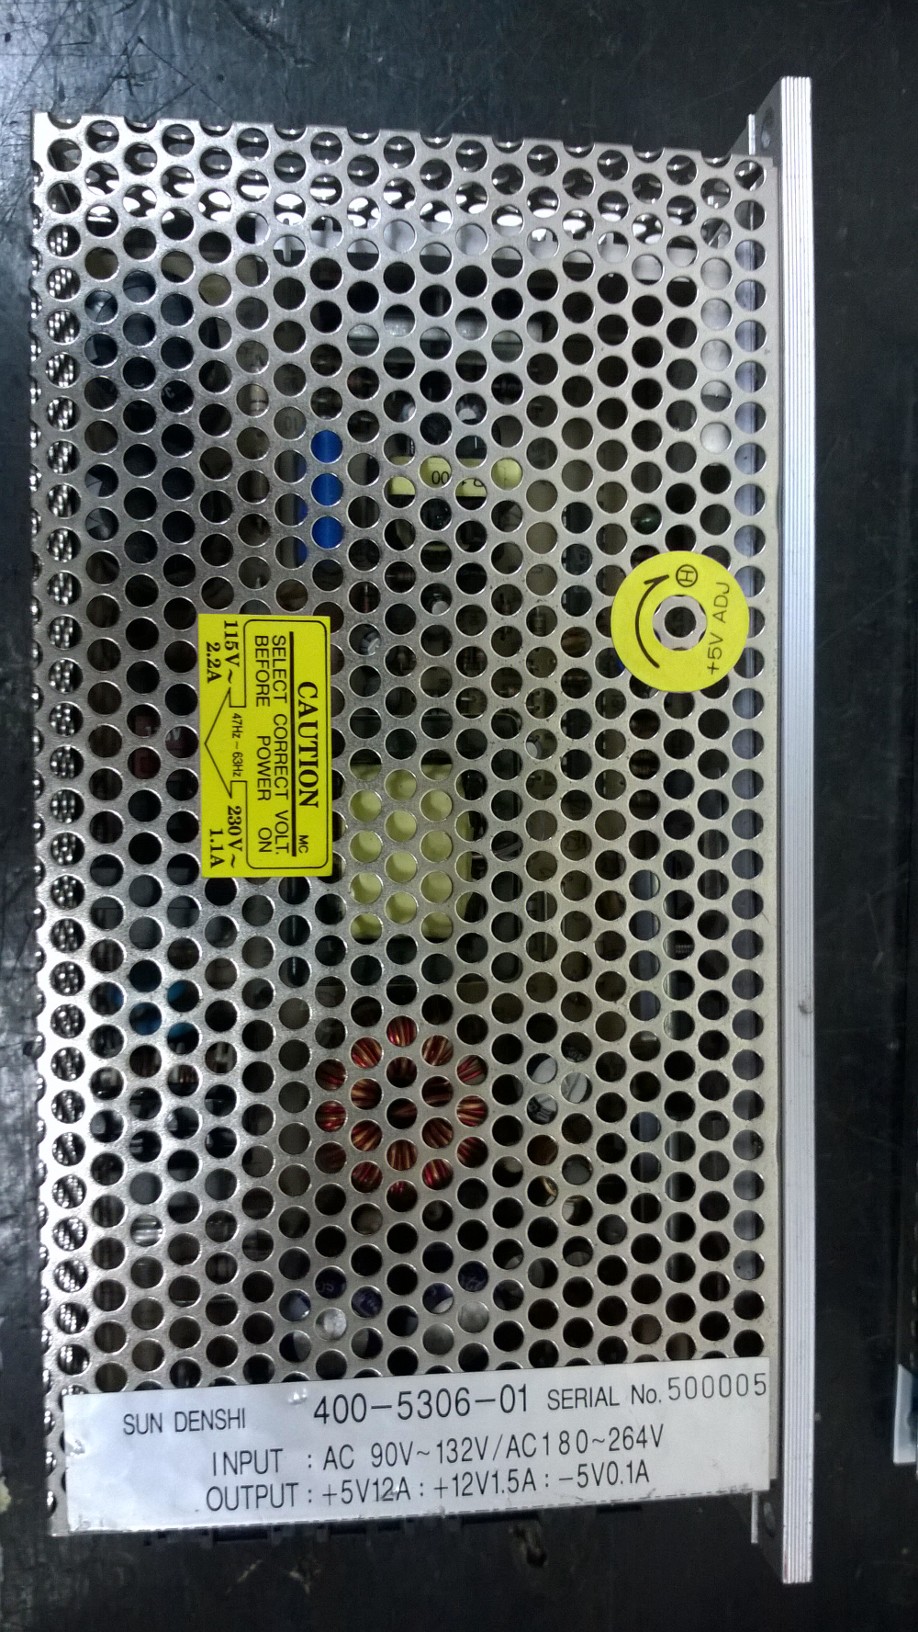
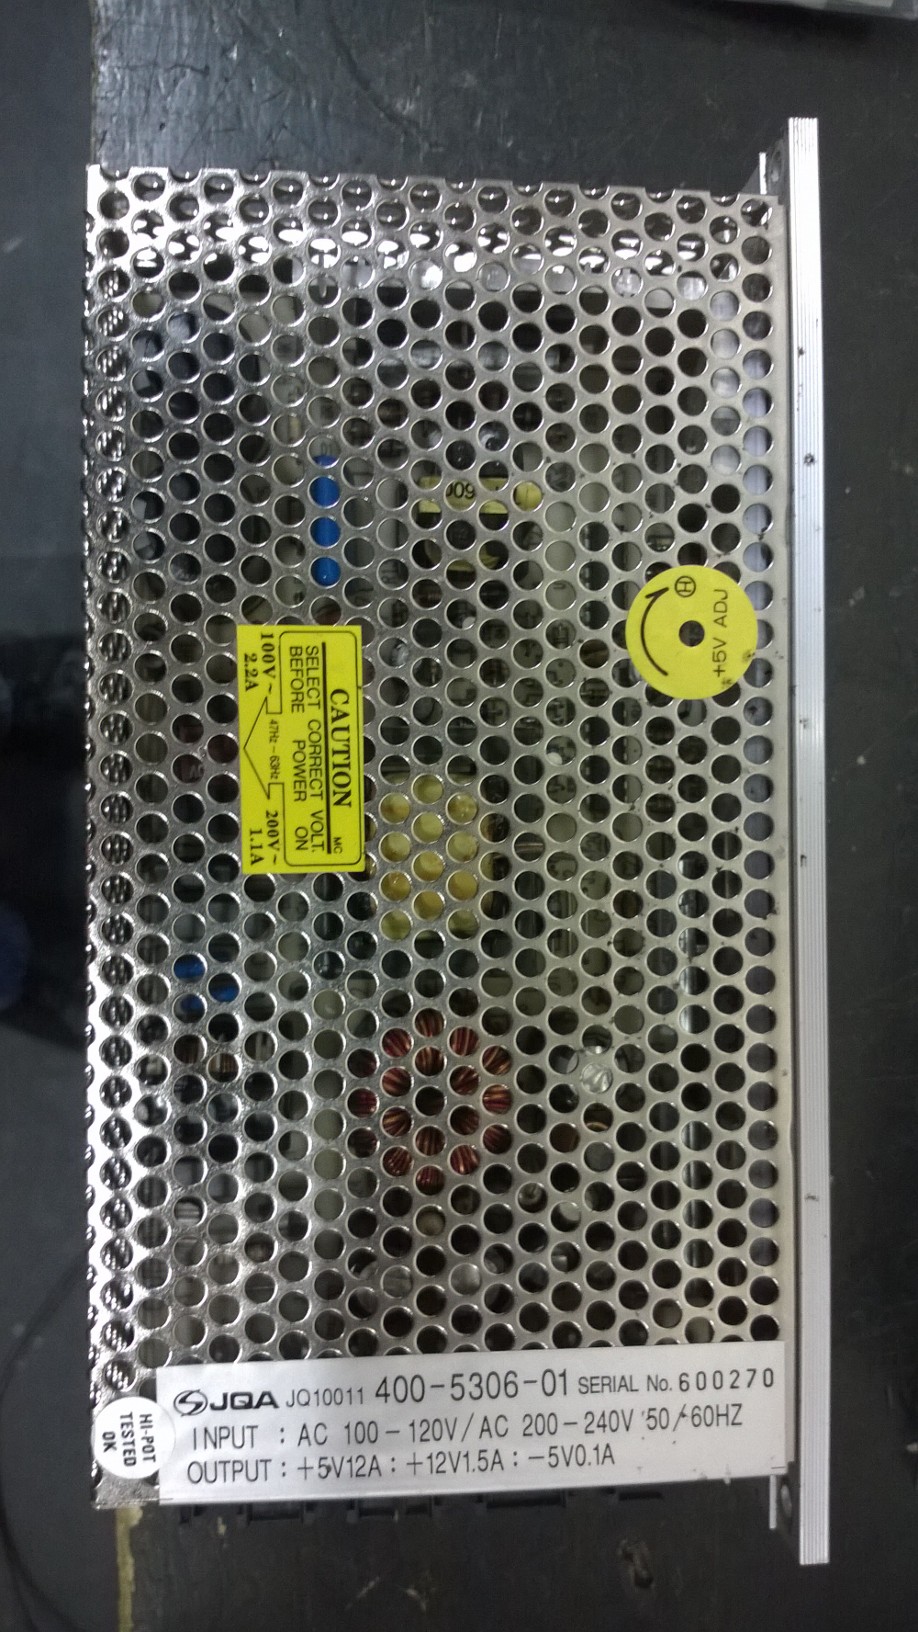
400-5306-01 PSU
Update - 06-July-2015
The circuit boards arrived from the manufacturer, and they look fantastic. This board has been made with a thicker substrate than normal (2mm) and also has heavier 4oz copper to handle the high current required.
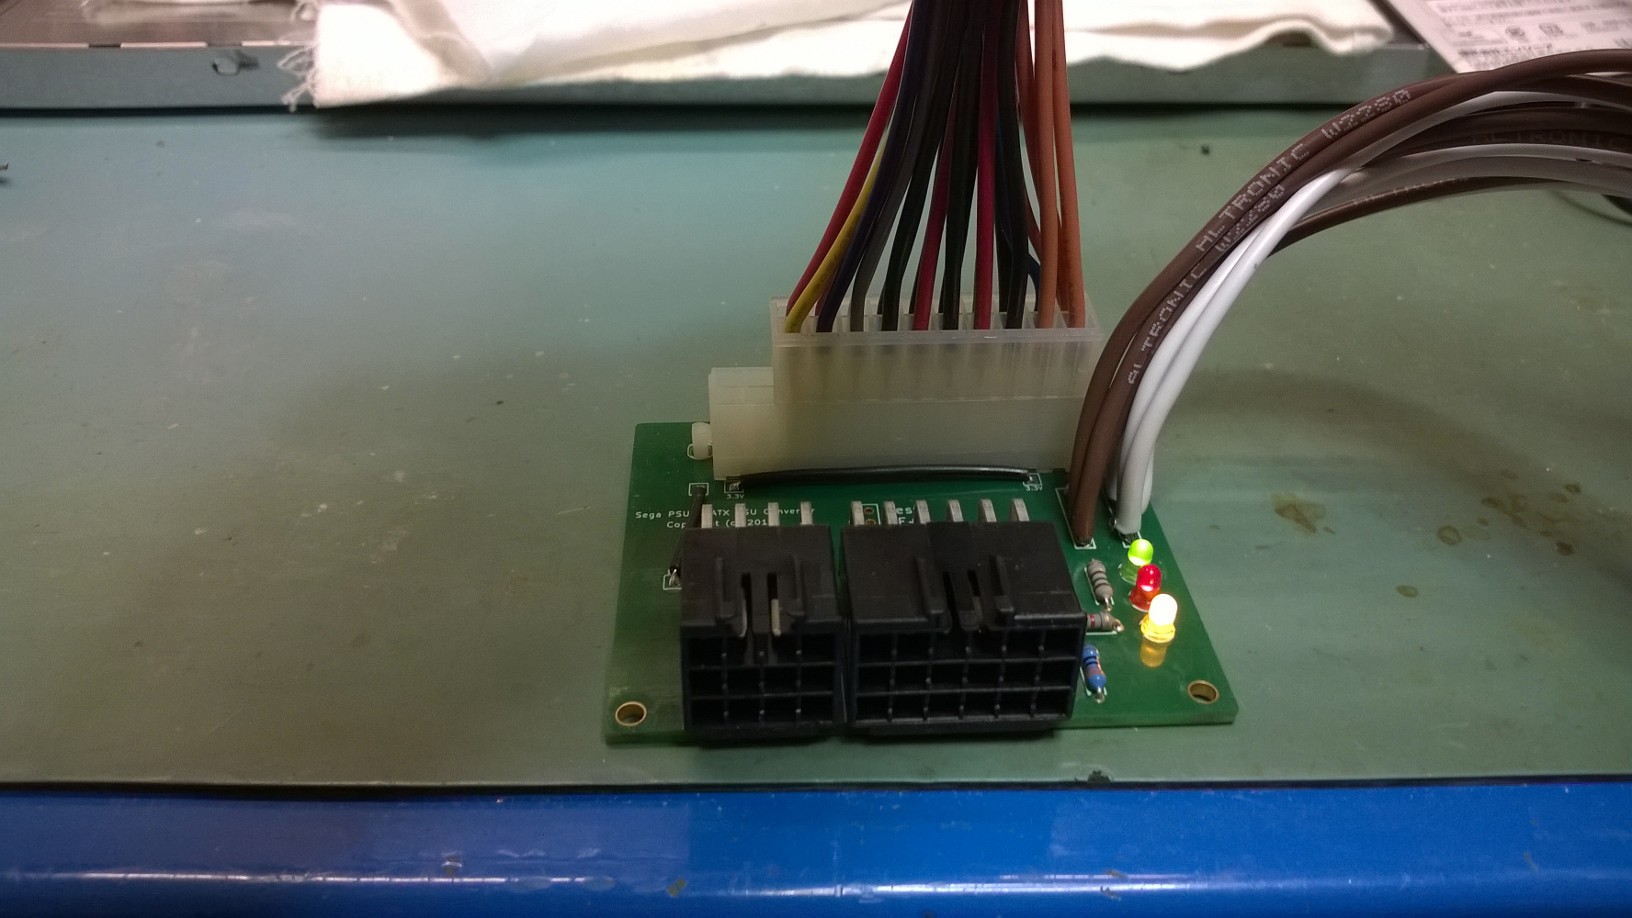
The board powered with a 20pin ATX psu. The board will work with 20 pin and 24 pin ATX Power supplies.
Green Led = 3.3v, Red Led = 5v and Yellow Led = 12v
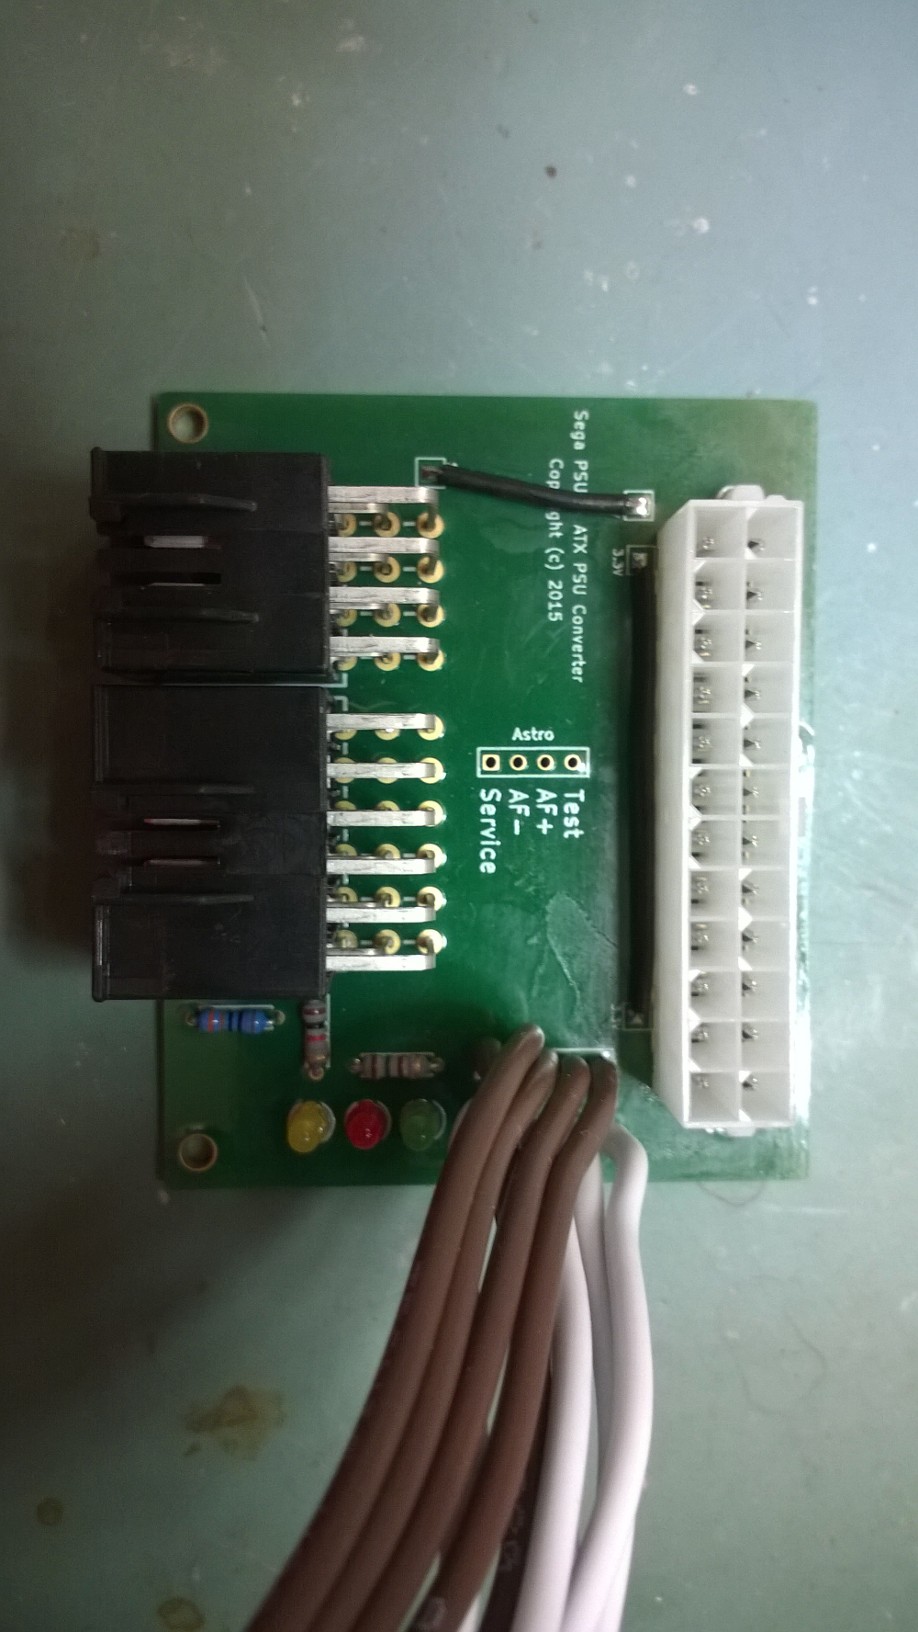
Top view of an almost finished board. Just missing the 4pin header in the middle of the board.
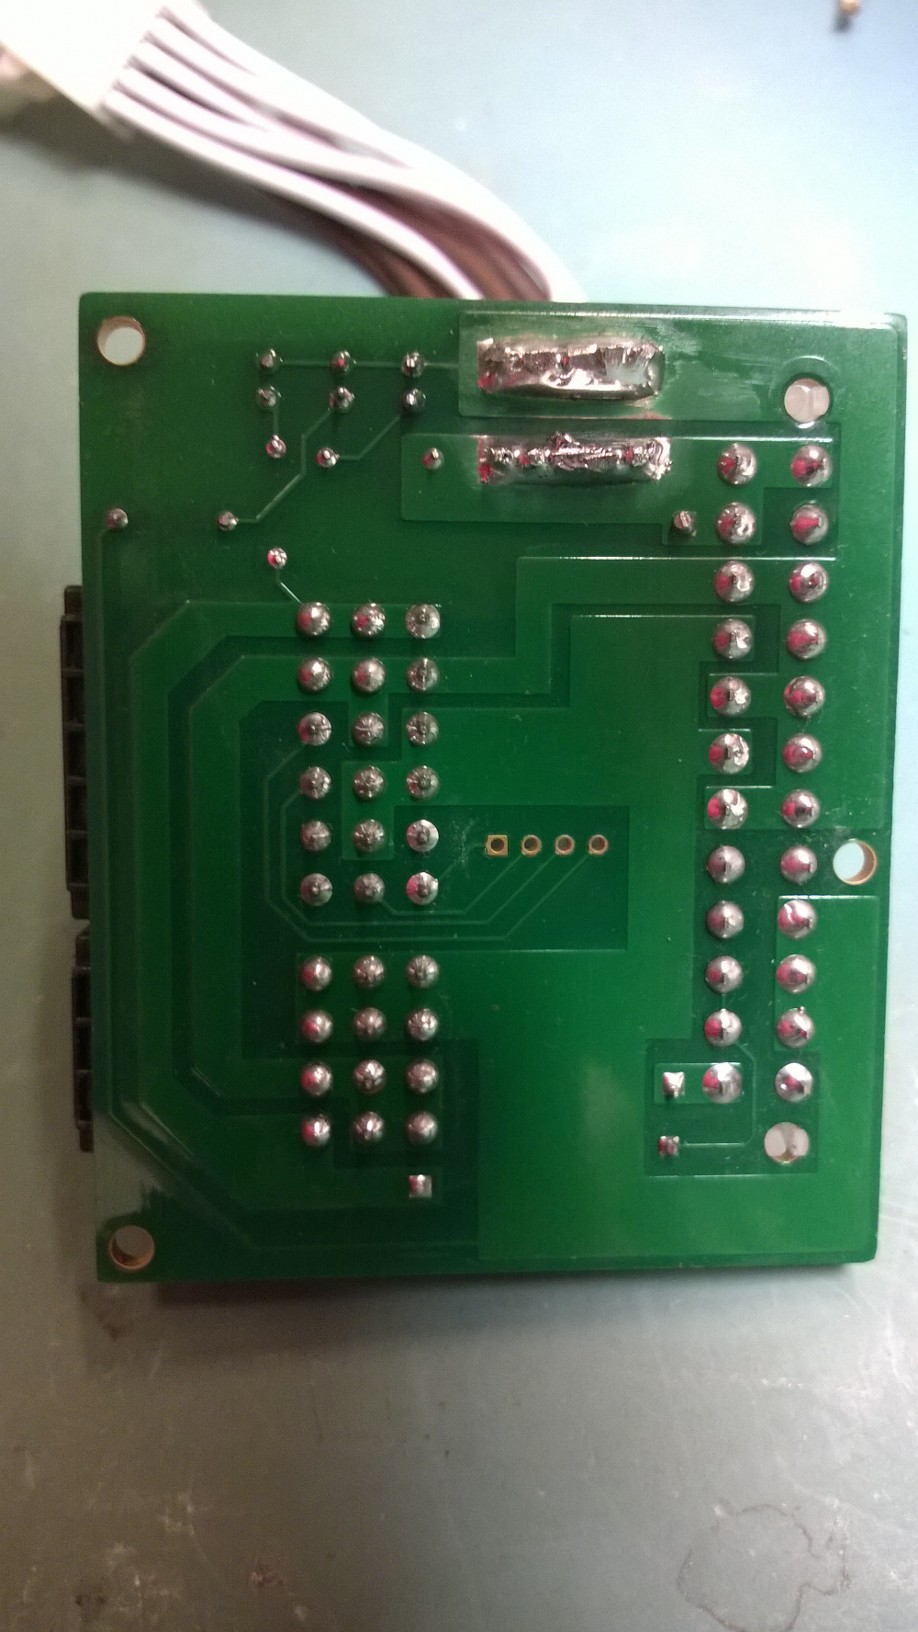
Bottom view of the almost finished board. Just missing the 4pin header in the middle of the board.
Update - 16-July-2015
The AC Board has arrived this morning.
The assembled AC Board
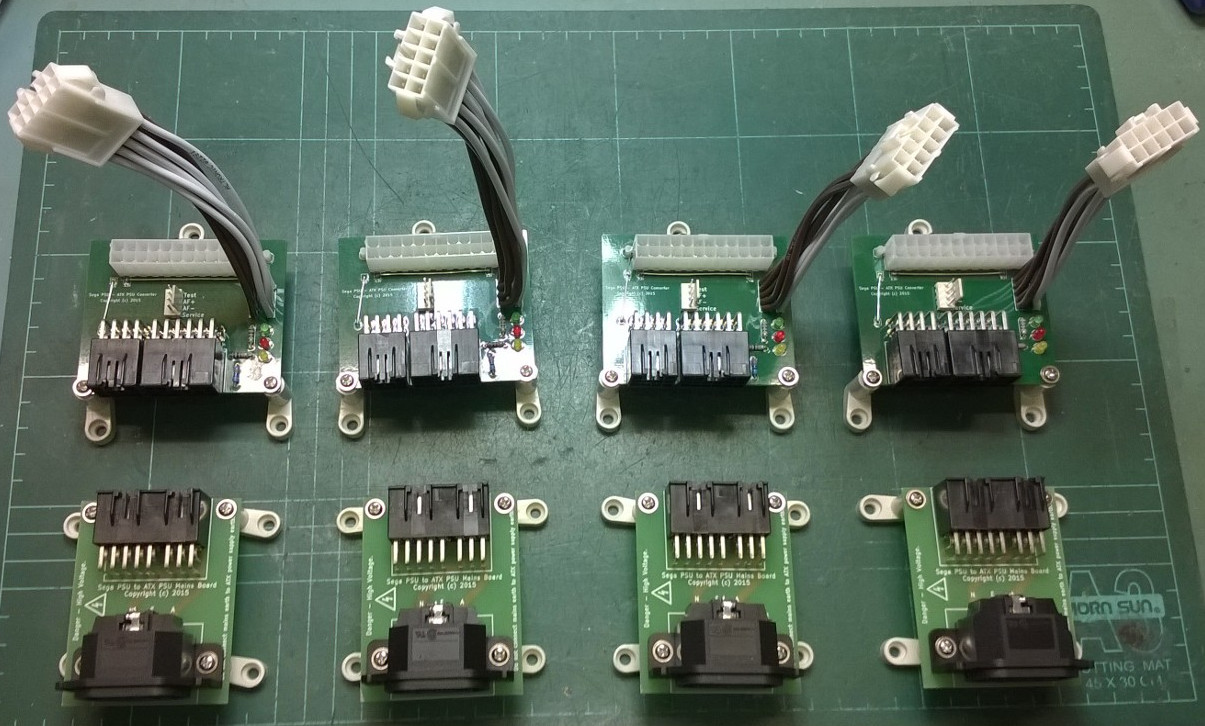
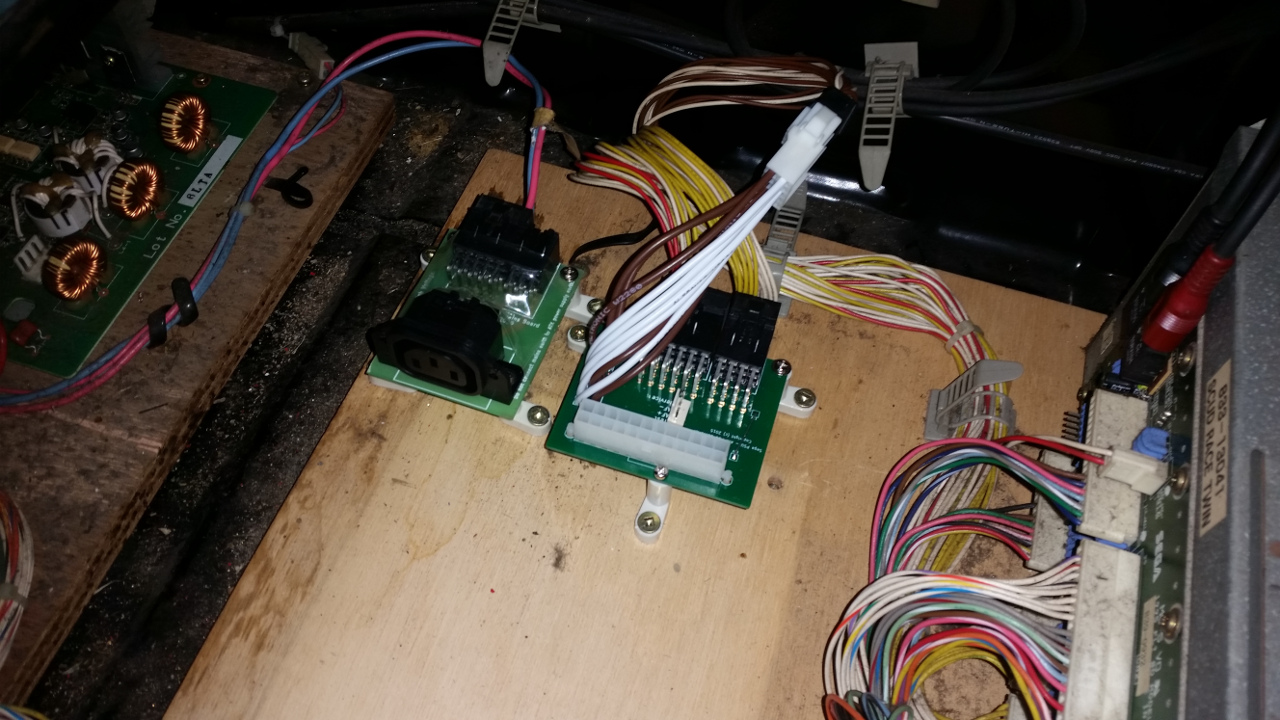
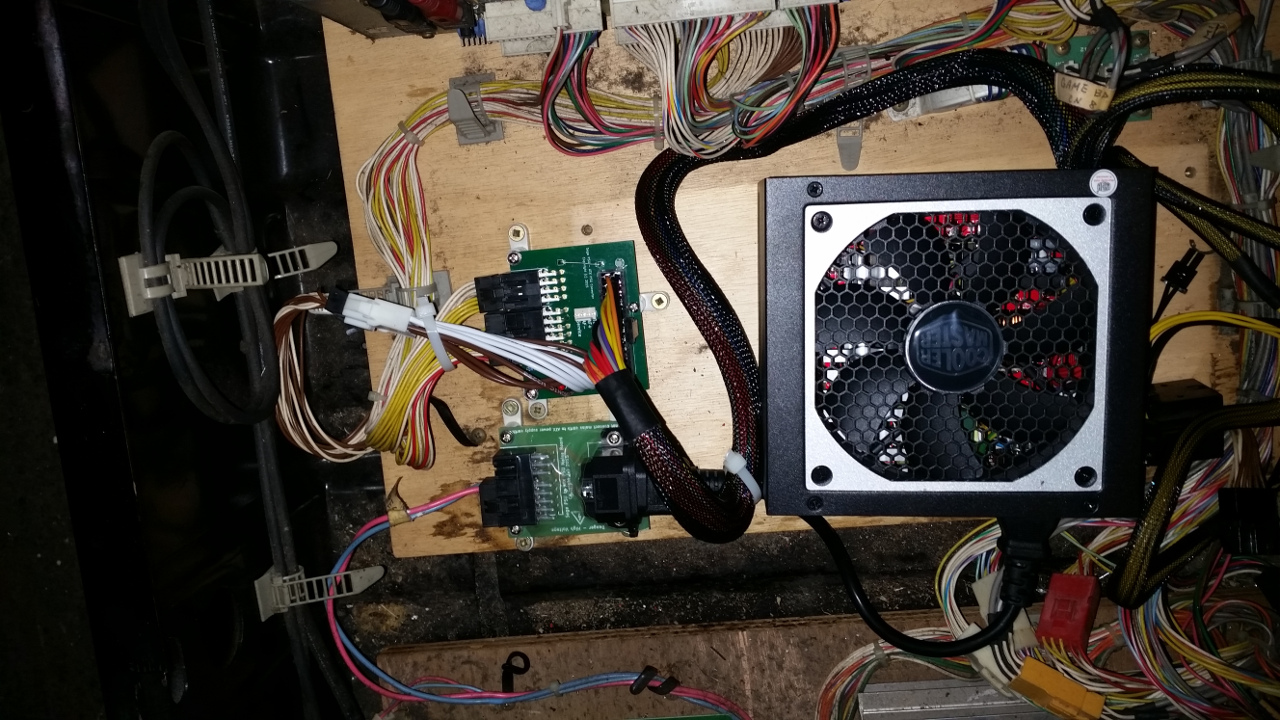
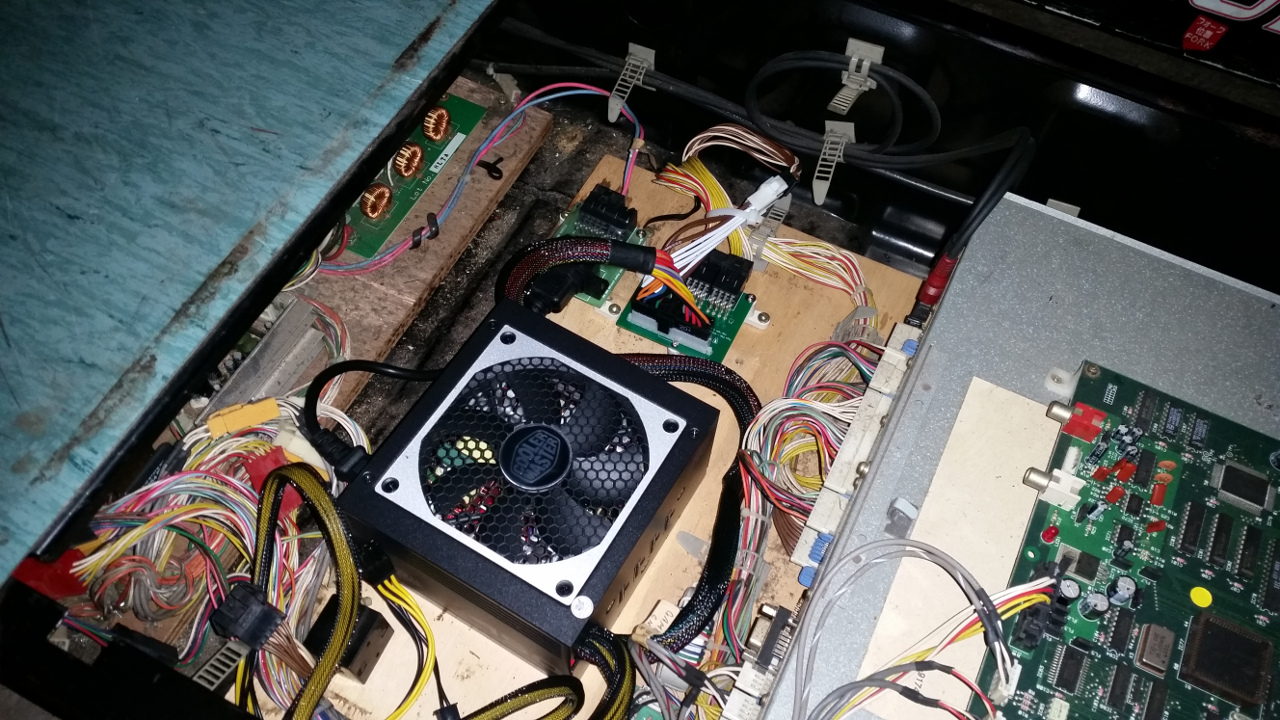
Both the boards together.
Update - 17-July-2015
The task of assembling the boards has begun.
Update - 17-July-2015
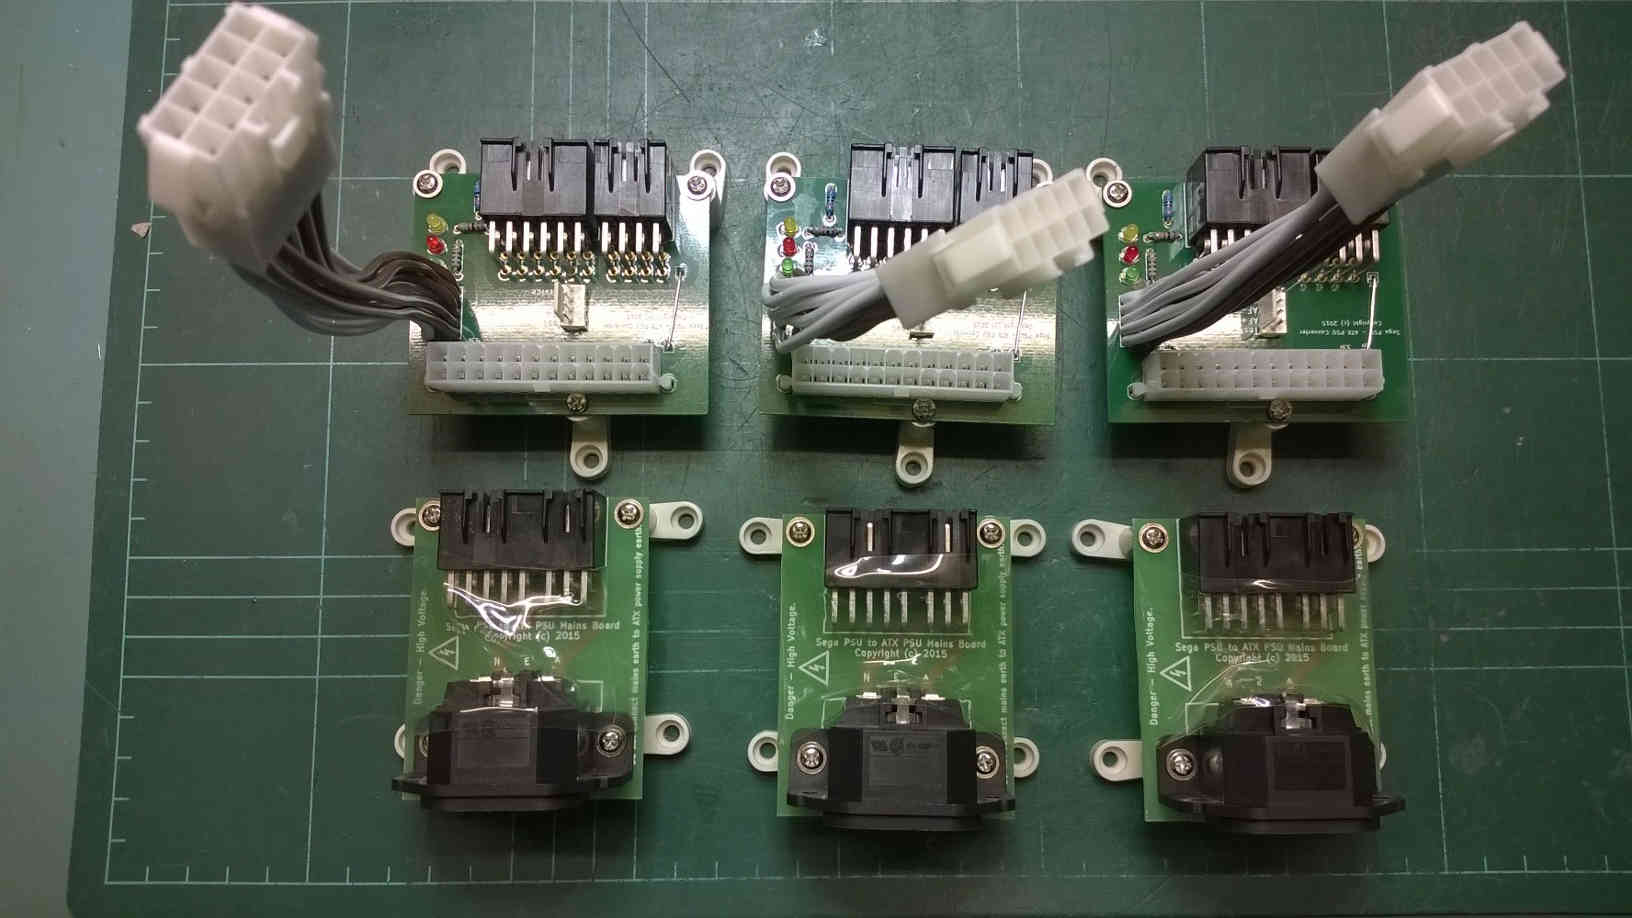
The finished product. The AC board has some transparent heat shrink over it to provide a little bit of protection from it being put on top of a metal case, or someone touching it while its live.
Below are some photo's from the an installation by Aaron in New Zealand who was kind enough to send these photo's back.
Recently a friend had a faulty power supply come in for repair. It had the usual problems of blown caps in the secondary, but this one also had issues on the primary side and had blown its FET, a couple of smd resistors and the PWM. The PWM was a LD7575PS. As neither of us had any of these PWM's on hand I decided to go searching for a possible replacement that we may have instead of having to wait for them to arrive from a supplier/ebay.
After a lot of searching on Google, I was unable to find anything except for a post on a forum somewhere that stated there was no replacement that was pin compatible. I did not believe this, so I kept looking. Eventually I decided to search for a datasheet on a PWM that I had, with the markings DAP08. which I had not been able to find anything on. After some searching, for some reason, I ended up searching DAP008 instead, and low and behold, there it was. So now I had both datasheets, I was able to do a quick comparison. To start with, the pinouts were identical, so now it was just the electrical characteristics that were going to determine if it could be used. The frequency of the LD7575 can be set by a resistor between RT (pin 1) and Ground. The datasheet shows that a 100K resistor will give a frequency of 65KHz on the LD7575, and that is exactly what the power supply we were repairing had. So now that I knew the switching frequency, I looked at the DAP008 datasheet and sure enough, the frequency on the DAP008 was also 65KHz.
With this information we fitted the DAP008 to the power supply and fired it up and sure enough, it sprang to life. We did not even remove the 100K resistor between pin 1 and ground. So we put some load onto the outputs and left it running on test for a little while and nothing was getting hot so off it went back to the client, and its been running happily ever since.
As part of voicing of my concern, I sent the below letter to my local MP to show that I am against the proposed laws that are now in Parliament. It is looking like the bill will pass with little to no opposition unless we all get up off our backsides and make it known to all the politicians that we do not want this law passed.
Dear Ms Bishop,
I am strongly opposed to the Governments proposed Data Retention laws, both as the owner of a ISP/CSP and also as an individual.
The proposed laws,
Lack in technical merit. meaning that they will be simple to circumvent. Making the whole process a very expensive failure. Not that this has ever stopped a government before.
Infringe on basic rights, and your rights to privacy and freedoms that we are all taught about in school. So much for Australia the lucky country. Even China is appearing to be more liberal now.
Are not wanted by the public. So the government should be listening and dropping the whole process. The government is elected to represent the people of Australia, not to control them and spy on them.
Will add significant costs to operating a small ISP/CSP, such that we may no longer be able to compete with larger companies at all.
Has been found to be invalid in the EU due to privacy. Not to mention that I do not trust ASIO or The Federal Police to "Do the Right Thing" when it comes to using peoples private data. The reason for the courts is to make sure that they only get access when it is warranted, and not just because they think it will be interesting to see what they are doing on the off chance that they might find one bad guy.
What ever happened to freedom in Australia? If this bill passes, what will the government try next? Maybe pass a law that requires all citizens wear gps ankle bracelets like convicts, so that the security agencies can see where you were two years ago.
Please do not allow this bill to continue, you are making Australia the laughing stock of the world, and ultimately will have a tremendously negative effect on the Australian Technology Sector for both private citizens and businesses alike.
Sincerely
{signature}
Categories
WHMCS Module for ISPConfig
Back in September 2014 I purchased the commercial version of the ISPConfig module for WHMCS from Germanius on the ISPConfig forum and for the most part the module worked, however there is an error that is being reported by many users in which you get the error “SOAP Error: no_server_error” when you enable the create website function. After having no joy trying to get this fixed by Germanius, I finally got frustrated enough that I ended up writing a new version of the module and released it as opensource under the GPL3.
You can find the module at http://www.github.com/cwispy/ispcfg3
For instructions on how to configure the module, see the wiki https://github.com/cwispy/ispcfg3/wiki
For support or other issues, please see the thread on HowtoForge
https://www.howtoforge.com/community/threads/new-ispconfig-module-for-whmcs.67824/
Categories
My updates to rawNumbers.php for Nagvis
At work I utilize Nagios to monitor our systems and Nagvis to display things in a visual way on a large screen monitor so we can see whats it going on at a glance. One of the gadgets we use quite a bit is the rawNumbers.php by Sascha Runschke. Now while it works well at what it does, which is displaying data as a number in image format, it is very limited with customizations. Nagvis gives you the ability to pass options in the gadget_opts field so that you can choose what you want to display. What I have done is to add some extra functionality to the gadget to allow you to modify the following
* divide = <value> divides the perfdata by this number.
This allow you to set the divisor for traffic data which is in bps to show as MB/s. As an example, your perfdata is 3752690,4Bits/s and you use divide=1048576, then rawNumbers will display 3.5 as the output
* datauom = <string> shows this as the uom instead of the perfdata, showuom must not be set to 0.
This is a fairly simple change that allows you to change what displays after the value. For example, you might want to show Hz for Hertz or C for Celsius after your values. Note that showuom must not be set to '0' or whatever you set here will not display.
* showuom = <0|1> default = 1 shows the unit of measure.
This allows you to turn off the display of the unit of measure so it does not display.
* string = s s is a string the perfdata label has to contain
This allows you to choose what to display if you have multiple perfdata in the array. It is handy when displaying traffic counters. You would set string=traffic_in and string=traffic_out to get both in the inbound and outbound traffic data to show. Replace traffic_in / traffic_out with your own perfdata names of course.
This example uses gadget_opts of:
In: showuom=1 divide=1048576 datauom=Mb string=traffic_in
Out: showuom=1 divide=1048576 datauom=Mb string=traffic_out

Here is another example from a UPS. These use divide=10 to format them correctly.
Download the below file and extract the contents into your nagvis gadgets directory. (likely something like /usr/share/nagvis/share/userfiles/gadgets) Be sure to back up the original files first in case something goes wrong.
Download rawNumbers.zip
Hopefully these changes will come in handy for someone else.
Categories
Links to other websites
Jomac Pty Ltd, Has been supplying technical support to the Amusement Machine industry since 1983.
2000 Computers & Networks Pty Ltd, provide quality hosting services at affordable prices.
Australia's largest Retro Arcade, Pinball and Mame Forum.
High quality replacement pcbs and components for Arcade, Pinball and Retro Computers.
For hire, sales and service of pinball and other fun game.
Categories
Service Repair Tools
Over the years there have been numerous improvements in servicing tools such as soldering irons and desoldering tools. These are some of the tools which I have used over the years in the industry.
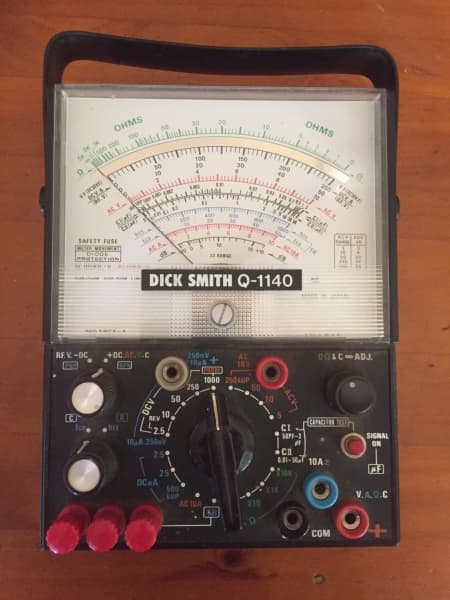
I found my old Dick Smith Q1140 analog Multimeter when having a clean up. I found that I still had the original leaflet type manual in the original box, so I have scanned it to pdf for archival purposes.
Dick Smith Multimeter Q1140 Manual
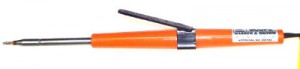
One of the very first soldering irons I used was a Scope soldering iron, which consisted of a 5V 30A transformer and separate hand-pieces. I still have my unit sitting in an old toolbox in the back room. Maybe one day I should donate it to a museum!

I had the Superscope hand-piece like this one below which was made of Bakelite and after many years of use became quite brittle. The later updated the design to use new generation of plastics which were quite a bit better at keeping the heat away from the handle and did not seem to become brittle with age.
I also had the Miniscope hand-piece later on, which was quite a bit smaller and easier to get into hard to reach places on tv's, vcr's and cd players etc. The temperature on the iron was controlled by the user by holding the switch down and letting it go to regulate the heat at the tip, which was a bit of an art, but once you got used to them, they became quite easy to use.
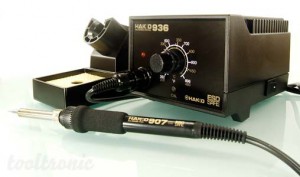
After the Scope came one of the most well known Hakko soldering irons on the market, which is still around even today, the Hakko 936 temperature controlled iron. These irons were the work horse and compared very well to the Weller and Pace equivalent units that were also on the market. I still pull this unit out from time to time when I need to do some work on the road, or away from the workbench and its just too hard to get the bench iron to the job.
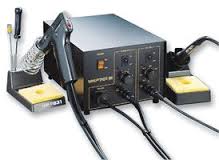
The next upgrade was not really an upgrade as such. I got a Hakko 701 which is a combination of a 936 iron and a 474/808 desoldering gun. I still use the desoldering gun on this unit, but the soldering iron has been put away in favour of the Metcal unit listed below.
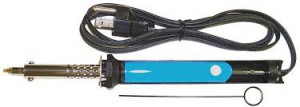
Speaking of desoldering, this Weller unit was one of the first powered desoldering pumps which I used, and for its time, it did work quite well, even if it was quite a large unit and it was laborious having to press the plunger back in each time.
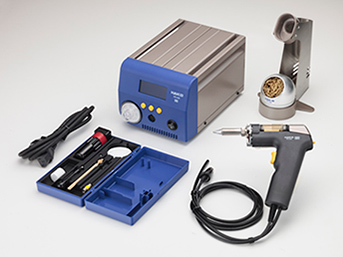
The late came a few years ago. It was a Metcal MX-500 series soldering station with both the Metcal Advanced hand-piece and the UltraFine hand-piece which I install a 0.2mm ultra fine tip into for those fine repair tasks that are just too small to use the standard iron or hotair for. This iron has been without a doubt the best iron I have ever used. The unit has lots of power to tackle those lead free solder boards that you just could not tackle before with the likes of the older Hakko irons. Add to that the ability to quick change the tip's along with the massive range of tunnel tips for smd devices, such as dpak, soic, sop, soj, som, qfp, sqfp, tqfp, plcc and the unit is hands down the best irons that I and my best friend Jomac have ever used. There is a brand on the market called Thermaltronics which is very similar to the Metcal units, but in my experience, the power supplies do not have the power of the Metcal unit and the tips do not last as long or have the same quality or feel of the Metcal tips.
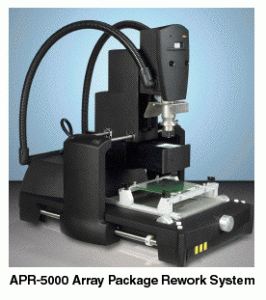
Now we live in the world of BGA devices, it became apparent a number of years ago that without the correct tools, a lot of boards would simply not be repairable by us, so we got the Metcal APR-5000-DZ Rework system. This unit consists of the main unit pictured below and a PC with software which in conjunction with the sensors on the unit and a high power camera provides the ability to rework boards up to about 30 x 35cm in size. This unit has been absolutely unbelievably handy to us and has allowed us to repair so many boards which we would have otherwise had to write off or send off to the manufacturer for repair.
Edit: 08-Oct-2015:
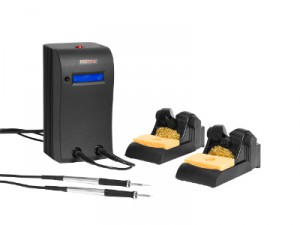
This is the latest edition to the work bench replacing the Hakko 701. I purchased the Hakko FR-400 Desoldering Station which is rated at whopping 300W and has the power to tackle those heavy ground planes etc. I have not had the unit for too long, but I am really liking its power.

Edit: 03-Sep-2016:
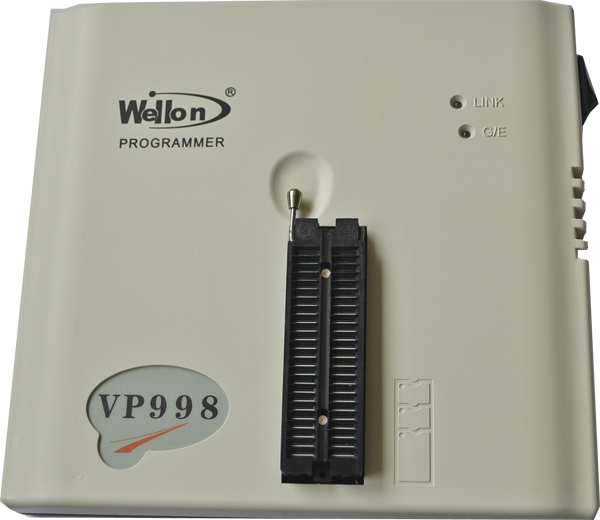
The latest edition to the toolkit is a Wellon VP-998 Universal programmer. This unit supports some 80,000+ IC's and includes ttl/cmos and dynamic/static ram tests.
Edit: 08-Apr-2017
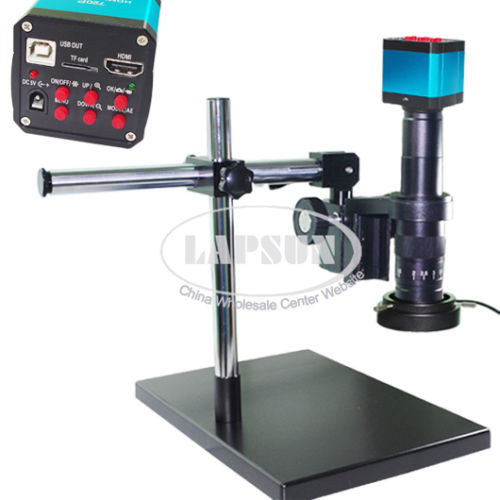
Purchased a digital microscope to get high quality look at smd components and for very small reworking of components.
Edit: 22-Dec-2020
Purchase the professional Repair Kit to perform better quality repairs on circuit boards. This toolkit contains all the necessary items to perform repairs out of the box.

Edit: 12-Oct-2023
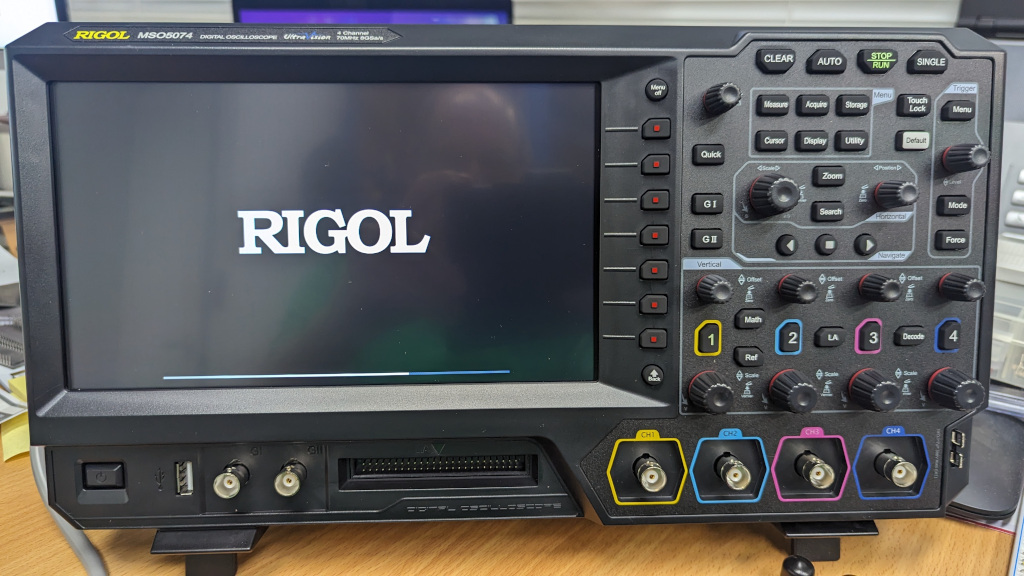
The latest addition to the workbench is a Rigol 4 Channel Oscilloscope with 350MHz bandwidth, 16 Channel Logic Analyzer and 2 Channel 25MHz Arbitrary Wave Form Generators.
If you use FTP and require the ability to resume file transfers and your sitting behind a Fortigate appliance, you will probably want to create a rule specifically for FTP traffic without AntiVirus rules. If you do not disable AntiVirus, you will get an error like "502 Command REST not allowed by policy".
If FTP resume is required and can be restricted to a certain destination host, or a group of destination hosts, then that is preferable to leaving it open to all destinations.
Categories
Add denied sessions to session table
Fortinet published a SysAdmin Handbook article called "Adding denied sessions to session table" http://docs.fortinet.com/d/fortigate-adding-denied-sessions-to-session-table. In that article there is an error.
They have the process listed as
config system setting
set ses-denied-traffic enable
set block-session-timer 60
end
Where in fact the correct process to implement session blocking is