Categories
IT Stuff

Shorewall bouncer script for Crowdsec

If, like me, you have started using Crowdsec on your linux servers and you also use Shorewall and Shorewall6 for managing your iptables rules, you will have no doubt found that there is no native bouncer available in the crowdsec repo. I found a blog post at http://www.sysadminguide.net/crowdsec-and-shorewall/ which contained a bash script to be used with the crowdsec-custom-bouncer, but as I use both IPv4 and IPv6 on my servers, this script did not work. So I have modified the script to the below and have been testing it successfully for a few days now. Feel free to use this if it is of use to you.

#!/bin/sh
#
# Script to add /remove IPs to shorewall blacklist

#determine action
if [ "$1" = "add" ]; then
if [[ "$2" =~ .*[.].* ]]; then
logger -t crsec-shorewall4 "add $2 for $3 with $4"
shorewall drop "$2"  > /dev/null 2>&1
elif [[ "$2" =~ .*[:].* ]]; then
logger -t crsec-shorewall6 "add $2 for $3 with $4"
shorewall6 drop "$2"  > /dev/null 2>&1
fi
elif [ "$1" = "del" ]; then
if [[ "$2" =~ .*[.].* ]]; then
logger -t crsec-shorewall4 "del $2 for $3 with $4"
shorewall allow "$2"  > /dev/null 2>&1
elif [[ "$2" =~ .*[:].* ]]; then
logger -t crsec-shorewall6 "del $2 for $3 with $4"
shorewall6 allow "$2"  > /dev/null 2>&1
fi
else
logger -t crsec-shorewall "unknon action"
fi

Save the above code into a file such as /etc/crowdsec/bouncers/crsec-shorewall.sh and make it exectuable. Next edit the /etc/crowdsec/bouncers/crowdsec-custom-bouncer.yaml file and edit the line bin_path: to read

bin_path: /etc/crowdsec/bouncers/crsec-shorewall.sh

Save the file and restart the crowdsec-custom-bouncer and your shorewall should now be used to add and remove ip address bans.
Categories
IT Stuff

LibreNMS ATEN 8216 PDU Support

Update: These changes have been accepted into the LibreNMS project so there is no need to manually add the below.

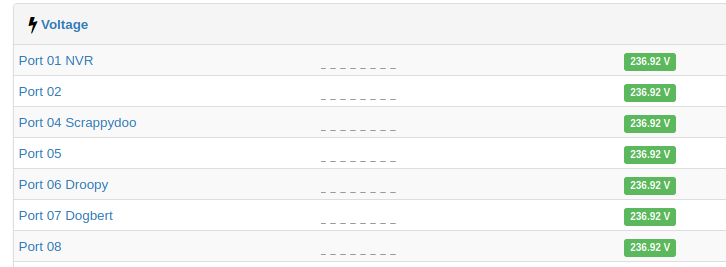
Below is the configuration files required for monitoring the power outlets on a LibreNMS system.

File: /opt/librenms/includes/definitions/discovery/atenpdu.yaml

mib: ATEN-PE-CFG_int.mib:ATEN-PE-CFG_str.mib
modules:
sensors:
power:
options:
skip_values:
-
oid: outletIntegerPower
op: '=='
value: '-2000000'
data:
-
oid: ATEN-PE-CFG::outlet
value: outletIntegerPower
num_oid: '.1.3.6.1.4.1.21317.1.3.2.2.2.2.99.1.4.{{ $index }}'
divisor: 1000
descr: 'Port {{ $outletName }}'
index: 'outletIntegerValueIndex.{{ $index }}'
low_limit: 0
high_limit: 2400
current:
options:
skip_values:
-
oid: outletIntegerCurrent
op: '=='
value: '-2000000'
data:
-
oid: ATEN-PE-CFG::outlet
value: outletIntegerCurrent
num_oid: '.1.3.6.1.4.1.21317.1.3.2.2.2.2.99.1.2.{{ $index }}'
divisor: 1000
descr: 'Port {{ $outletName }}'
index: 'outletIntegerValueIndex.{{ $index }}'
low_limit: 0
high_limit: 10
voltage:
options:
skip_values:
-
oid: outletIntegerVoltage
op: '=='
value: '-2000000'
data:
-
oid: ATEN-PE-CFG::outlet
value: outletIntegerVoltage
num_oid: '.1.3.6.1.4.1.21317.1.3.2.2.2.2.99.1.3.{{ $index }}'
divisor: 1000
descr: 'Port {{ $outletName }}'
index: 'outletIntegerValueIndex.{{ $index }}'
low_limit: 190
high_limit: 260

File: /opt/librenms/includes/definitions/atenpdu.yaml

os: atenpdu
text: Aten PDU
type: power
icon: aten
mib_dir:
- aten
nobulk: true
over:
- { graph: device_current, text: Current }
- { graph: device_voltage, text: Voltage }
- { graph: device_power, text: Power }
poller_modules:
applications: false
availability: true
bgp-peers: false
ipmi: false
mempools: false
mpls: false
ntp: false
os: true
ospf: false
ports: false
sensors: true
stp: false
wireless: false
discovery_modules:
bgp-peers: false
cisco-vrf-lite: false
cisco-mac-accounting: false
cisco-pw: false
cisco-cef: false
cisco-sla: false
cisco-cbqos: false
cisco-otv: false
cisco-qfp: false
fdb-table: false
ipv4-addresses: true
ipv6-addresses: true
mempools: false
mpls: false
ntp: false
ports: false
ports-stack: false
processors: false
route: false
sensors: true
storage: false
stp: false
ucd-diskio: false
vlans: false
wireless: false
discovery:
-
sysObjectID: .1.3.6.1.4.1.21317

You also need to upload the mib files to /opt/librenms/mibs/aten/

All the files can be downloaded from here.

Finally if you would like the devices logo to show as Aten, you will need to upload a logo named aten.png or aten.svg to the /opt/librenms/html/images/os/.

Categories
IT Stuff

mcp23x17 php class library for Raspberry Pi

I recently had a job which required me to utilise a bunch of Microchip's MCP23017 16-Bit I/O Expander with Serial Interface. I needed to use a web interface to control the I/O ports, and after spending a bit of time looking around online, I found quite a number of Python modules and a few written in C, but not a lot for php. Dont get me wrong, there are a few around, but most of the ones I found are integrated into other systems and I gave up looking at splitting the code out and ended up writing my own. I decided to post the code to GitHub under the GPL3 license for others to use for free if they choose to.

https://github.com/cwispy/mcp23x17

The module uses the i2c-tools. The README.md file on GitHub provides details on how to install these tools, and how to add the apache webserver to the i2c group so it has permission to read and write from the i2c bus.

Categories
IT Stuff

WHMCS Module for ISPConfig

Back in September 2014 I purchased the commercial version of the ISPConfig module for WHMCS from Germanius on the ISPConfig forum and for the most part the module worked, however there is an error that is being reported by many users in which you get the error  “SOAP Error: no_server_error” when you enable the create website function. After having no joy trying to get this fixed by Germanius, I finally got frustrated enough that I ended up writing a new version of the module and released it as opensource under the GPL3.

You can find the module at http://www.github.com/cwispy/ispcfg3

For instructions on how to configure the module, see the wiki https://github.com/cwispy/ispcfg3/wiki

For support or other issues, please see the thread on HowtoForge

https://www.howtoforge.com/community/threads/new-ispconfig-module-for-whmcs.67824/

Categories
IT Stuff

My updates to rawNumbers.php for Nagvis

At work I utilize Nagios to monitor our systems and Nagvis to display things in a visual way on a large screen monitor so we can see whats it going on at a glance. One of the gadgets we use quite a bit is the rawNumbers.php by Sascha Runschke. Now while it works well at what it does, which is displaying data as a number in image format, it is very limited with customizations. Nagvis gives you the ability to pass options in the gadget_opts field so that you can choose what you want to display. What I have done is to add some extra functionality to the gadget to allow you to modify the following

* divide = <value> divides the perfdata by this number.

This allow you to set the divisor for traffic data which is in bps to show as MB/s. As an example, your perfdata is 3752690,4Bits/s and you use divide=1048576, then rawNumbers will display 3.5 as the output
* datauom = <string> shows this as the uom instead of the perfdata, showuom must not be set to 0.

This is a fairly simple change that allows you to change what displays after the value. For example, you might want to show Hz for Hertz or C for Celsius after your values. Note that showuom must not be set to '0' or whatever you set here will not display.
* showuom = <0|1> default = 1 shows the unit of measure.

This allows you to turn off the display of the unit of measure so it does not display.
* string = s s is a string the perfdata label has to contain

This allows you to choose what to display if you have multiple perfdata in the array. It is handy when displaying traffic counters. You would set string=traffic_in and string=traffic_out to get both in the inbound and outbound traffic data to show. Replace traffic_in / traffic_out with your own perfdata names of course.

This example uses gadget_opts of:

In: showuom=1 divide=1048576 datauom=Mb string=traffic_in

Out: showuom=1 divide=1048576 datauom=Mb string=traffic_out

image1

Here is another example from a UPS. These use divide=10 to format them correctly.

image2


Download the below file and extract the contents into your nagvis  gadgets directory. (likely something like /usr/share/nagvis/share/userfiles/gadgets) Be sure to back up the original files first in case something goes wrong.

Download rawNumbers.zip


Hopefully these changes will come in handy for someone else.